Koolpte 80mm Refractor Telescope Review: Worth It? (November 2026)
The Koolpte telescope suits beginners who want an 80mm refractor with a 600mm focal length and useful starter accessories. Its 25mm and 10mm eyepieces provide 24x and 60x magnification, with a phone adapter and carrying bag included.
On this page (10 sections)
- What does the Koolpte telescope include?
- How do aperture and focal length shape the Koolpte telescope's view?
- Are the Koolpte eyepieces and Barlow useful?
- How does the Koolpte's manual mount affect observing?
- How does the Koolpte compare with similar beginner refractors?
- Can you take Moon photos with the Koolpte phone adapter?
- How should you set up the Koolpte telescope for the first time?
- What common mistakes should you avoid with the Koolpte?
- What are the Koolpte telescope's main trade-offs?
- Should you choose the Koolpte telescope?
The Koolpte telescope is an 80mm beginner refractor with a 600mm focal length, two eyepieces and a phone adapter. It suits someone who wants a straightforward manual scope with several accessories in one kit and plans to view the Moon and brighter sky targets.
The 25mm and 10mm eyepieces give 24x and 60x magnification. The included 3x Barlow raises those figures, but extra magnification does not add detail and can make the view dimmer and harder to track.
What does the Koolpte telescope include?
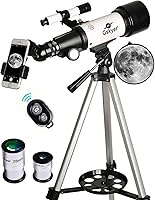
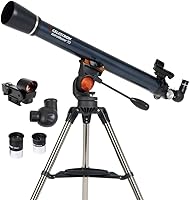
The Koolpte pairs an 80mm refractor with the main accessories for a first setup. The kit includes two eyepieces, a 3x Barlow lens, a 5x24 finder scope, phone adapter, wireless remote, adjustable aluminum tripod and carrying bag.
Koolpte 80mm Refractor: Best for first-time observers

- 80mm aperture
- 600mm focal length
- 25mm and 10mm eyepieces
- Phone adapter and carrying bag
A beginner-oriented refractor with two eyepieces, a 3x Barlow lens, phone adapter, wireless remote and carrying bag. Its manual alt-azimuth mount keeps the controls straightforward.
Pros
- 80mm aperture
- Two eyepieces included
- Phone adapter, remote and bag included
- No-tool setup
Cons
- Manual mount requires you to point and track by hand
- The 3x Barlow increases magnification but does not add detail
The included pieces cover basic viewing, aiming and simple phone photography, so you can start without buying an eyepiece right away. You will still need to learn the controls, align the finder and practice focusing before a night of observing.
Who is the Koolpte telescope best for?
The Koolpte fits a beginner or family that wants a refractor for visual observing and casual phone photos. Its bag helps with storage and carrying, while the phone adapter and remote offer a way to try taking pictures through the eyepiece.
Skip it if you expect motorized tracking, electronic object finding or detailed deep-sky imaging. The mount is manual, and the phone adapter does not guide or stabilize the telescope.
How do aperture and focal length shape the Koolpte telescope's view?
The Koolpte’s 80mm aperture gathers light, while its 600mm focal length helps determine magnification. These figures help you compare beginner refractors, but the eyepiece, focus, support and observing conditions also affect what you see.
Aperture affects brightness and resolving detail. An 80mm objective can show the Moon and brighter targets, but it cannot overcome haze, poor focus, a shaky tripod or bright urban skies.
Focal length works with an eyepiece to determine magnification. Divide 600mm by the eyepiece’s focal length: 600 divided by 25 gives 24x, and 600 divided by 10 gives 60x.
The telescope magnification guide explains how to work out magnification and why adding power has limits. Begin with the 25mm eyepiece for a wider view, then switch to the 10mm once the target is centered.
Are the Koolpte eyepieces and Barlow useful?
The two eyepieces provide a low-power starting view and a higher-power option. The 25mm eyepiece produces 24x, while the 10mm produces 60x.
The 3x Barlow multiplies the magnification of either eyepiece. It cannot reveal detail beyond what the aperture and viewing conditions can support, so use it only when the image stays sharp and steady.
Start with the 25mm eyepiece when locating a target. Its wider view makes it easier to find and center an object while you are learning the finder scope.
Once the target is centered, switch to the 10mm eyepiece if the image remains clear. Add the Barlow only when the view holds together; remove it if the image gets dim, blurry or difficult to track.
Our guide to telescope eyepieces explains how eyepiece focal length changes the view. Compare the image at each setting instead of choosing by the largest magnification number.
How does the Koolpte's manual mount affect observing?
The Koolpte uses a manual alt-azimuth mount that moves up, down, left and right. You point the tube by hand and make small adjustments to keep a target in view as Earth turns.
This control layout is simple to learn, but it does not track a target automatically. At higher magnification, an object crosses the view more quickly, so you may need to nudge the tube often.
Place the tripod on firm, level ground and tighten its adjustment points. Use a light touch on the tube and focus control to reduce shaking while you observe.
If you want to compare mount styles before buying, read equatorial vs alt-azimuth telescope mounts. This manual mount makes more sense for casual visual viewing than for automated tracking.
How does the Koolpte compare with similar beginner refractors?
The main differences between these beginner refractors are aperture, focal length and included accessories. The Gskyer is smaller and shorter, while the Celticbird shares the Koolpte’s aperture and focal length.
| Telescope | Aperture | Focal length | Included accessories to note |
|---|---|---|---|
| Koolpte 80mm Refractor | 80mm | 600mm | Phone adapter, remote, bag, two eyepieces, 3x Barlow |
| Gskyer 70mm AZ Refractor | 70mm | 400mm | Phone adapter, remote, bag, two eyepieces, 3x Barlow |
| Celticbird 80mm Refractor | 80mm | 600mm | Phone adapter, backpack, moon filter, two eyepieces |
| MEEZAA 80mm Refractor | 80mm | 500mm | Phone adapter, waterproof backpack, two eyepieces, 3x Barlow |
The Gskyer 70mm AZ review covers the shorter, smaller-aperture option. Choose between the Koolpte and Celticbird based on the accessories that suit you, since their aperture and focal length match.
Koolpte 80mm Refractor vs Gskyer 70mm AZ Refractor
The Koolpte has a larger aperture and longer focal length than the Gskyer. The Gskyer’s smaller, shorter optical setup may suit someone prioritizing a compact travel telescope, while it also includes a phone adapter, wireless remote, bag, two eyepieces and a 3x Barlow.
Read our Gskyer telescope review for more on that model. Choose it for its shorter 400mm focal length; choose the Koolpte if its larger aperture and 600mm focal length better match your observing plans.
Koolpte vs Celticbird 80mm Refractor
Both telescopes have 80mm apertures and 600mm focal lengths. The Koolpte includes a wireless remote and carrying bag; the Celticbird includes a moon filter and backpack, with 20mm and 9mm eyepieces instead of the Koolpte’s 25mm and 10mm pair.
If the filter matters to you, read what a moon filter does. A moon filter is for lunar viewing and is not a solar filter.
Koolpte vs MEEZAA 80mm Refractor
The MEEZAA has an 80mm aperture and a shorter 500mm focal length. It comes with two eyepieces, a 3x Barlow, phone adapter and waterproof backpack.
Choose it if the shorter focal length and backpack fit your needs better. The Koolpte is the clearer match if you prefer the longer focal length and its included wireless remote.
Can you take Moon photos with the Koolpte phone adapter?
The adapter and remote give you a way to try phone photography through the eyepiece. Center the Moon, focus the telescope, then position the phone camera over the eyepiece until the image fills the screen without dark edges.
Phone adapters can take patience to align. Secure the phone before letting go, keep the tripod steady and use the remote to reduce movement when taking a photo.
Start with the Moon because it is bright and easy to find. A phone camera may adjust exposure or focus in ways that make the photo look different from what your eye sees through the eyepiece.
Our telescope phone adapter guide explains alignment and common fit issues. Treat the adapter as a way to capture simple views, not as a promise of detailed astrophotography.
How should you set up the Koolpte telescope for the first time?
Set up the Koolpte on level ground with the tripod secured and the finder aligned. Follow the included instructions, then focus on a distant daytime object that is not the Sun.
Attach the tube and accessories firmly before aiming. Keep the 25mm eyepiece in place while you learn the controls, since lower magnification gives you a wider view.
If the finder points away from the telescope’s main view, targets will be hard to locate. Align it during daylight on a distant object, then check the alignment again after moving the telescope.
See our first-time telescope setup guide for a step-by-step sequence. Never aim the telescope at or near the Sun.
What common mistakes should you avoid with the Koolpte?
The most common mistakes are starting at high magnification, skipping finder alignment and expecting the phone adapter to steady the scope. Each can make a beginner’s first observing session harder than it needs to be.
Begin with the 25mm eyepiece and a bright, easy target. Center the object before changing eyepieces, and remove the Barlow if the view becomes dim or difficult to focus.
Check the tripod and finder before the sky gets dark. A loose setup or misaligned finder wastes observing time, while a light touch on the focus control helps keep the view steady.
Expect the phone to need careful positioning at the eyepiece. Take time to align the camera, secure the phone and use the remote, especially when the telescope is pointed high in the sky.
What are the Koolpte telescope's main trade-offs?
The Koolpte’s main strengths are its 80mm aperture and included beginner accessories. The eyepieces, Barlow, finder, phone adapter, remote and carrying bag cover several common first-telescope needs.
Its main compromises are the manual mount and the limits of an 80mm aperture. You must track objects by hand, and the scope is less suited to faint targets than a larger telescope.
Do not judge it by the Barlow’s highest magnification number. The sharpest useful view may come from lower power, a steady tripod and a clear night.
Should you choose the Koolpte telescope?
Choose the Koolpte telescope if you want an 80mm beginner refractor with a 600mm focal length and a broad accessory kit. It is a good fit for learning visual observing, viewing the Moon and trying simple phone photos through the eyepiece.
Choose the Gskyer if its shorter 400mm focal length and 70mm aperture suit your travel plans. Pick the Celticbird if its moon filter matters most, or the MEEZAA if you prefer an 80mm telescope with a 500mm focal length and waterproof backpack.
For more options, browse our best refractor telescopes for beginners. Match the telescope to how you plan to observe, then use its lower-power eyepiece first to find and center your target.
Frequently asked questions
What can you see with the Koolpte 80mm telescope?
The Koolpte's 80mm aperture and 600mm focal length make it a beginner telescope for viewing the Moon and brighter celestial targets. What you'll see depends on sky conditions, setup and the target's position.
What magnification does the Koolpte telescope have?
Its 25mm and 10mm eyepieces provide 24x and 60x magnification with the 600mm focal length. The included 3x Barlow lens can increase those figures, but higher magnification also makes the view dimmer and harder to keep steady.
Does the Koolpte telescope work with a phone?
Yes, it includes a smartphone adapter and wireless remote. The adapter holds a phone at the eyepiece, but photos depend on alignment, focus, steadiness and conditions.
Is the Koolpte 80mm refractor easy to set up?
Koolpte describes the telescope as a no-tool setup and includes an adjustable aluminum tripod. Attach the optical tube, align the finder and practice focusing in daylight on a distant non-solar object before trying it under a dark sky.